Spiced Beet Latkes with Za’tar Labneh Dip

I can’t believe I haven’t been back to the blog to post in such a long time. I’ve been so busy with instagram, I’ve sadly neglected my trusty blog. But I’m back. I had to blog for Chanukah. I had to get in on all the latke action!

Chanukah always has me thinking about latkes. Somehow I’m all about the latkes – more so than the sufganiyot. Maybe if I did a savory take on donuts, I’d get into it more. But latkes work for me. All the flavors and that crispy bite. Always gets me.

This latke was inspired by recent trip to Israel. At one place I want, I had an amazing dish that was served with a spiced labneh. Labneh is a Middle Eastern yogurt cheese that is a great stand-in for sour cream. It’s also similar to a Greek yogurt, but a bit more sour. When sprinkled with a bit of olive oil and Za’atar from the shuk, it’s amazing.

In addition to the amazing Za’atar, I had some wonderful red beets from my CSA share that I wanted to use. I typically just roast them and toss them in salads, but I knew that I wanted to feature them in my Chanukah latke fest.

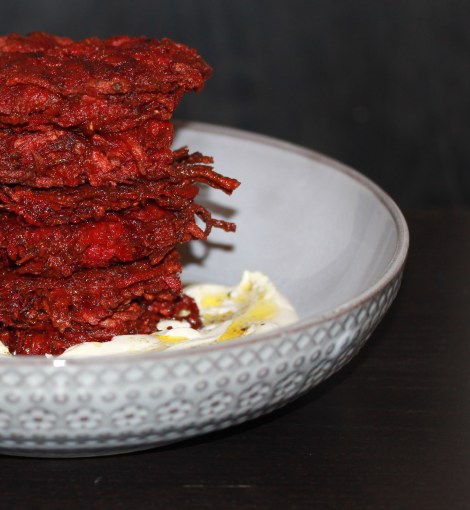
I shredded the beets up with onion, garlic and some potatoes. Then, I mixed in some flour, eggs and spices. I fried them up and drained them. Then served them up with some labneh that I sprinkled with Za’atar and drizzled olive oil.

So good. Make it. Have a Happy Chanukah!


Spiced Beet Latkes with Za'tar Labneh Dip
 
Author:
Ingredients
  • For the Latkes
  • 7 small beets
  • 1 onion
  • 4 cloves garlic
  • 2 medium potatoes
  • 3 tsp. Whole Spice Turkish Spice Mix (Cumin Toasted, Garlic, Coriander Toasted, Onion, Sea Salt, White Pepper, Parsley, Turmeric, Green Cardamom)
  • 3 large eggs
  • 2 tsp. kosher salt
  • 2 tsp. ground black pepper
  • Oil for frying
  • For the Labneh dip
  • 3 tbsp. Labneh (you can sub Greek Yogurt)
  • 3 tsp, za'tar
  • oil for drizzling - about 2 tsp.
Instructions
  1. Peel all the veggies. It helps to wear gloves
  2. Shred all the veggies in a food processor
  3. Transfer everything to a bowl
  4. Squeeze out as much liquid as possible
  5. Mix in the eggs, flour, salt, pepper and spices
  6. Heat oil in fry fry pan over medium-high heat
  7. Add mixture to pan - a couple tablespoons at a time, forming the latkes
  8. Fry on each side for a couple minutes - until crispy
  9. Drain on a paper towel lined baking sheet with a cooling rack on top
  10. Place labneh in a dish and sprinkle with za'tar. Drizzle with olive oil
  11. Serve and enjoy!


Cranberry Glazed Corned Turkey Roast

Cranberry-Turkey

A whole bunch of Jewish holidays just ended and I’m already gearing up for the next set. How did that happen so fast?

This year, in the good ol’ US of A, we have the pleasure of two holidays happening at the same time. Thanksgiving happens to fall on the first night of Chanukah! They say this awesome phenomenon won’t happen for another 79,000 years. Since I don’t plan on being around for the next round of Thanksgivukkah, I thought it best to do something this year to honor the holiday. Two great foodie holidays colliding! I’ve got to do something, right? So stick around this blog. I hope to share a few more Thanksgivukkah recipes with you over the next month.

When I was at the kosher market the other day, they had a display of corned meats. My husband loves corned beef,  and when I saw they had corned turkey roasts, I decided that this would be perfect. I rarely make turkey, so this would be a special treat.  My aunt makes a great corned turkey, and swears that when she makes it, it tastes a bit like ham. I can’t be the judge of that, but this corned turkey came out pretty good, and would be perfect for a Thanksgiving/Chanukah holiday dinner mashup. It’s also great for any shabbat or festive dinner.

The corned turkey comes vaccum-sealed and wrapped in twine. I recommend rinsing the turkey well before cooking. You first boil the turkey for about an hour and a half, then you glaze it and bake it further. I took the twine off before baking, but left it on while I let it simmer. I added some pickling spice and onions to the water bath.

For the glaze, I usually make something similar to what I do for corned beef, but since I have Thanksgiving on my mind, I created a cranberry glaze for this dish. It worked out well! I will definitely do it again!

corned-turkey-cooking


Cranberry Glazed Corned Turkey Roast
 
Author:
Recipe type: Poultry, Thansgiving, Main Course
Ingredients
  • 3 lb corned turkey roast (If you can't get corned turkey where you live, you can substitute corned beef)
  • 2 tbsp. pickling spice
  • 1 onion, sliced
  • ½ can whole berry cranberry sauce
  • ¼ cup brown sugar
  • 2 tbsp. white vinegar
  • 2 tbsp. chopped rosemary
  • 1 tbsp. chopped thyme
  • 2 tsp. chopped ginger
  • 2 tbsp. chili sauce
  • 1 tbsp. chopped garlic
Instructions
  1. Rinse the corned turkey roast.
  2. Place the turkey in a large pot of water. Add the pickling spice and the onion. Bring the water to a boil. Turn down the heat and cover with a lid. Simmer for an hour to and hour and a half.
  3. Preheat the oven to 375.
  4. After the hour and a half, transfer the turkey roast to a baking pan.
  5. Mix up the rest of the ingredients and pour over the turkey.
  6. Bake in the oven for around 40 minutes.
  7. Baste the turkey every 20 minutes with the sauce.
  8. Remove from the oven. Let cool a few minutes.
  9. Slice and serve.
  10. Enjoy!

Cranberry-Turkey

Baked Salmon with a Cumin Rub

This morning, I did something that I rarely remember to do. I took something out of the freezer to defrost. Gasp! In my morning rush, I can usually only handle my coffee and the kid’s lunches. In that order. As I was literally running out the door, I did a mad dash to the freezer and grabbed a couple of Ziploc pouches of frozen salmon. I buy large quantities of salmon at a time, and then freeze in meal size pouches. IIn theory, it’s a smart thing to do – when the process works. I often forget to take it out and am left scrambling at 5:30, and often running to the store for some fresh, defrosted fish or a brick of tofu. Things worked out in my favor today. This meant that a tasty and healthy dinner could happen in a reasonable amount of time. We even covered all of the basic food groups!  Rah, Rah!

Baked Salmon with a Cumin Rub
Ingredients

1 pound of salmon fillet
2 tbsp. olive oil
1 tbsp. crushed garlic
1 tbsp. crushed ginger
1 tbsp. cumin
salt
pepper

Preheat oven to 400.

Mix the olive oil with the spices.

Rub the spice paste on to the salmon.

Let the salmon marinate for about 20 minutes.

Bake in the oven for about 11 minutes. You don’t want to overcook the salmon.

Serve with a salad and some brown rice. Enjoy!

IMG_1254

Veggie Chili with Soyrizo

It was a veggie chili kind of day today.  Been pouring on and off all day. I’ve been wanting to make a big pot of chili for a while now. It finally happened today. Woke up to some crazy rain this morning. 

The ingredients can usually be found in my pantry. No reason not to hold off any longer. Chili is also a cheap and easy meal that goes a long way. Throw in some brown rice, cheddar cheese, and sour cream – and everyone’s happy.

Veggie Chili with Soyrizo

1 tbsp. vegetable oil
1 package of soyrizo (trader joe’s or friedas brand)
1 red onion, chopped
1 small yellow onion, chopped
5 cloves of garlic, chopped
6 medium baby bella mushrooms, chopped
1.5 cups assorted chopped peppers
1 jalapeno, chopped
1 medium zucchini, chopped
4 cans of beans – kidney and black bean combo
28 oz. of chopped tomatoes
2 tbsp. good balsamic vinegar
1 tbsp. chili powder
1 tbsp. cumin
salt, to taste

In a large pot, heat the oil.  Crumble up the soy chorizo and add it to the pot. Cook on medium-high for a few minutes. 

Add in all the chopped veggies and cook for around 5-10 minutes on medium high. Let all the veggies soften.

Add in the beans and the spices and stir a bit.  Add in the tomatoes. Add in the balsamic. Let the mixture come to a boil.  Cover the pot and let everything cook and simmer for about an hour. Add salt to taste.

Serve over brown rice with whatever toppings you desire. We enjoyed our chili over some brown rice tonight with some salad on the side.

Enjoy!

IMG_0281

Herbed Lemon Tofu

I have made my life easier by subscribing to RSS Feeds. Google makes it even simpler with their Google Reader. It puts all my favorite blogs in one place. No drawbacks, but some days, I can just sit and drool at the screen as I page through some of the food blogs that are sprinkled in. For most of my weekday recipes, I stalk many of the vegan and vegetarian blogs for ideas. I recently came across this tasty looking Herbed Lemon Tofu on the VegCooking Blog. It looked perfect for a simple Monday night dinner. It came out tasty. Even J loved it, and J is often pretty skeptical when it comes to tofu dinners. I served the tofu with some steamed asparagus with a lemon mustard sauce along with some basmati rice. Everything tastes better with a bit of basmati.

Herbed Lemon Tofu – (from VegCooking Blog)

Ingredients

1 package extra-firm tofu
2 tablespoons lemon juice
1/2 tablespoons apple cider vinegar
2 tablespoons soy sauce
2 tablespoons olive oil
2 tsp. chopped thyme
salt and pepper, to taste
I also added a couple teaspoons or garlic paste

Preheat the oven to 475°F.

Wrap the block of tofu in paper towels and press for 10 minutes by adding weight on top. Remove the paper towels and cut the tofu into 1/2-inch-thick pieces.

Combine the remaining ingredients in a small bowl.

Add the tofu to a casserole or baking dish in a single layer, then cover with the liquid mixture, turning once to coat.

Bake the tofu for 30 to 40 minutes, or until browned, and turn once halfway through baking.

Enjoy!

Pamela’s Gluten Free Pizza Crust

This is dedicated to my wonderful curly-haired family. Love you all!

A weekend in May found me back in my Midwest hometown. It was the first weekend in a few years that my sisters and I were all together. We tried to make the best of a stressful weekend.

A preface to this is that we all come from a bad gut family. Making a meal that works with every gut can be a challenge. On the menu for a home cooked Saturday night meal was wheat-free/gluten-free pizza. The one sticking point is it had to taste good. You may ask how this is possible. Thank the bad-gut lords that smile on us, that there are now numerous companies and aisles of grocery stores devoted to bad-gut, allergy crazed families.

Pamela’s baking mixes and finished products are a great asset to the hypoallergenic food network. We used Pamela’s wheat free bread mix to make the pizza dough. The recipe for chewy pizza crust, found on the side of the package is as follows:


Chewy Pizza Crust

1 bag Pamela’s Wheat-Free Bread Mix
1 yeast packet (enclosed in mix)
1/4 cup oil
1-1/2 cups warm water

Optional: Add 2 tsp Italian herbs and/or 1/2 cup grated cheese to dough

Dough makes two – 12 to 14-inch crusts.

Combine Pamela’s Wheat-Free Bread Mix, yeast packet, oil and water (no eggs are used).

With a Heavy Duty Stand Mixer mix on medium for 2 minutes. Our mixer decided not to perform for us. We were able to mix it by hand easily.

We also chose to add Trader Joes Pasta Seasoning Blend.

Pour 1/2 dough onto greased cookie sheet or pizza pan (for added texture sprinkle corn meal on pan). Use oil or non-stick spray on dough and fingers to keep fingers from sticking when spreading dough into pizza shape. This mixture is pretty gloopy and sticky. It will never get to be pizza hut style dough. Check out N’s beautifully manicured nails!

Let sit for 1 hour. It just barely rises.

Add your sauce and other toppings. We made up a sauce of canned chopped tomatoes, spices, sautéed shallots and garlic, and some jarred sauce. We used a combination of fresh mozzarella, goat milk gouda, and some “parmesan like cheese” found in the depths of my parents generously stocked fridge.

Bake in a preheated 375º oven for 25 to 30 minutes on a lower rack. Dough will puff when baking. For a crispier crust bake at 400º.

We finished off the finished pizza with some drizzled on truffle oil. Yum!
In the future, I would pre-bake the crusts for 15-20 minutes and then add the toppings. Our crusts were a bit under done. The crust did taste good, a little sweet though. We were impressed with the results and I would consider playing around with it further.


Creole Chex Mix

I love chex mix, but I don’t like the pre-packaged commercial stuff. I don’t like the taste of the foil bag, preservatives, and chemicals. I also don’t like the additional crunchy stuff put in like pretzels, bagel chips, and breadsticks. So whenever there is a sale on chex cereal, I bundle up my coupons and buy a few boxes for when I get the munchies.

If you look at the cereal website, just about anything can go into chex mix. I was impressed by their huge range of recipes. Everything from a curry chex mix to Hawaiian chex mix. I go for basic.

Creole Chex Mix

8 Tbsp. butter or margarine (I used Earth Balance Buttery Sticks)
3 Tbsp. Worcestershire sauce
2 tsp. creole seasoning
2 tsp. garlic powder
1 tsp. onion powder
3 cups Corn Chex
3 cups Rice Chex
3 cups Wheat Chex (my fave flavor in chex mix)
3 cups Cheerios

Heat oven to 250°F. In a large roasting pan, melt the butter in the oven. Stir in seasonings. Gradually stir in cereals until evenly coated.

Bake 1 hour, stirring every 15 minutes. Spread on paper towels to cool, about 15 minutes. Store in airtight container.
Happy Snacking!

1 2